Tuesday, May 21, 2013

LOADED FRITTATA


What is a Frittata?  The definition from about.com is: In the culinary arts, a Frittata is a flat Italian-style omelet that's usually prepared in a cast-iron skillet. A brunch menu classic.
 

To make a frittata, beaten eggs are cooked briefly in a hot skillet along with other ingredients such as onions, spinach, bacon and/or potatoes, and then topped with cheese and finished in the oven. When cooked in a round skillet, the frittata is then typically sliced into wedge-shaped portions for serving.

This got me thinking of a breakfast that would warm up really well for hubby's breakfast.  The first time I made it he raved about it, so this is another HUBBY APPROVED recipe!

Loaded Frittata Recipe

2 oz lean ham
1/4 cup hash browns
3 Tablespoons chopped onions
3 Large Mushrooms sliced
1/2 cup packed fresh baby spinach sliced 
1/8 cup Weight Watchers Mexican Shredded Cheese
1 Whole Egg
3 Egg Whites
Dash of Skim Fat Free Milk
Ground Pepper
Spray Oil
Oven safe Pan

1.  Peal and slice mushrooms.  I always peal my mushrooms.  Turn heat to Medium and Spray cast iron skillet with spray oil and add slice mushrooms.  Cook until done and all water is cooked out.  Set aside on plate.

2.  Re-spray pan and add hash browns.  Add pepper to your liking and cook for 3 to 4 minutes.  Add onion to hash-browns.  After another 2-4 minutes add Ham with potato, onion mixture.  Cook until everything is brown.  Remove to same dish with mushrooms.

3.  Beat very well the Egg, Egg whites and a splash of milk in a separate bowl.  Turn oven on to 375 degrees.

4.  Turn heat down on pan and  Re-spray again, add sliced spinach and cook until wilted.  Add all reserved ingredients.   Spray oil over top to assure it will not stick and add beaten egg.  Mix together quickly to assure everything is even.  Allow to set.  When you see that the total bottom is set and some of the top remove from heat.

5.  Place in heated oven of 375 degrees for 5 minutes.  Upon removeing top with cheese.  Slice and Enjoy! 

6.  This can be sliced and stored for a breakfast for the next day.  Warm in microwave oven for a Yummy breakfast at work
 
 Spray cast iron skillet and add sliced mushrooms.  Remove after cooked.
Add potato to same pan after spraying with oil.  Cook for 2-3 minutes.
 Add onion.  Saute for several additional minutes
Add ham to mixture.  Cook until browned.  Remove all to plate.


Chop spinach.  Spray pan with oil and saute spinach until wilted.


Beat 1 whole egg and 3 egg whites and a splash of milk.

 Add all reserved ingredients to pan.  Pour beaten egg on top and quickly stir to assure a even coat of all the ingredients.  Do not disturb after the first quick stir.  Allow the bottom to set over medium/low heat.
Once bottom is set place pan into oven.  Make sure you are using a oven safe pan.  Bake at 375 for 5 minutes.  Once out of the oven top with cheese.  Allow to cool slightly then cut into pieces.


Tuesday, May 14, 2013

Teen Video Play Room

I am sure that I am not aloneI just had to find something amazing to do with this room!

   We have a 14 year old that LOVES his video games.  When we moved we knew that we wanted  him to have his own room that he could have friends over and play for hours on end like they do.  For years he only had his bedroom for this and that got small and old fast.  We then gave up the home office room in our old house (we no longer used it) but we could never give it that "Teen" look.  We were planning on moving so we had to keep things neutral.  

Once we moved we gave him certain rooms.  Of course we could not change things right away, but I kept looking for inspiration. I knew the second I found the right thing I would hit it hard. 

 Houzz is my favorite place to look for ideas so I started there.   This was the only room up stairs that had some color.  Yucky color!
 We did move him in and made it his "Video Game" Room.  I kept searching for something really "Cool" to do and I found it.....
Here.  This was my Inspiration.
http://www.houzz.com/projects/10062/San-Clemente-Teen-Bedroom  
This is what we came up with for this room from  the inspiration of the above  link.  We could not find the exact things she used but  I think we did pretty well with what we had at our local  stores.  I tell you I am so happy with the way it came out.  It took a long time and allot of modifcation to get the look but it worked.  All his friends LOVE it!  I think it will be fine even when he is older.

Here we go.....Before...
And After The Futon Wall.


We did get this futon pretty quick so when our teen had a sleep over they had a place to stay.  Once we renovated the room we had to get a futon cover in black to fit over the mattress

I had to make the accent pillows because I could find them NO Where in Red!


 We had old office furniture in here, although really nice stuff it was not going to work in this new room so it was taken out. 
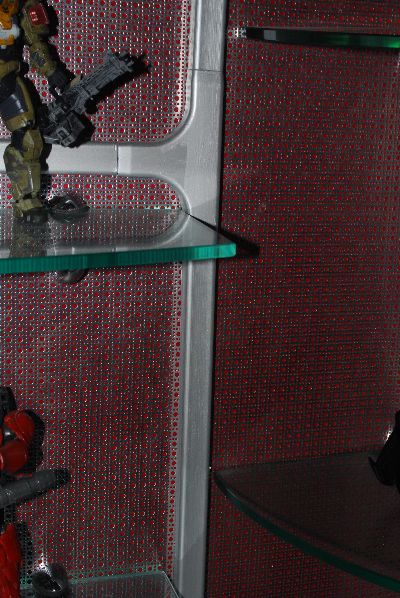
We ended up mounting the tv to the wall with a rotating mount.  and put up glass shelves from Lowe's.  You are seeing corner floating shelves and 4 straight floating ones 2 on each side.  We ended up making a wooden L shape box for the bottom and covering it with a silver leaf coating.  We then put a protective coat over it.  This covers all the cords and surge protectors on the floor.  
These are plastic wire covers that we painted with Matrha Stewart's Silver paint.  All the wires from everything are hidden in these up the walls.  Even the cable wire is hidden.
Closet window before photo.

 After photo with a new pop corn maker.

Wall with main door and closet door.  This is a small wall but we made it look amazing.
It took awhile to find just the right things to place on the wall but I think it works.   Hubby made the shelves and we painted them gloss black.  WE should have put an acrylic coat on them.  If you ever do something like that put that final coat on them so things will not stick.
In the original  photo it looks like  she does a whole sheet  of aluminum on the walls.   I did allot of research and found a place here that could get it but it was $159.00 per sheet, 5 sheet minimum.  I knew that was not going to happen.  We found  this at Lowe's.  It is an aluminum sheet.  I love that the holes show the red that was painted under it. (THE PHOTOS SHOW MORE RED THEN YOU CAN SEE IN REAL, I THINK IT IS BECAUSE OF THE FLASH I HAD TO USE)  So we painted the bottom part red, middle strip black, top strip white.  The bottom was covered with the aluminumWe had to spray it down with adhesive  spray.  As you see between the aluminum and black strip it needed a piece  of molding.  We painted it with Martha Stewart's Silver special paint.  We also did this between the upper black and white paint.  Between each aluminum piece we found a strip to glue to each seam to make everything crisp and clean.  We also replaced all  bottom molding with the same paint.

I think the room came out really well.  Like I said all his friends Love the room.  We also had to change out the celing fan and found this industral looking one.


I found this Lava Lamp also and had to silver leaf a small table for it.
 
We also re-did a End table I will update that tomorrow  when I get some good light.  I hope you have enjoyed our new room renovation.  I think it is amazing.

Update:
This is a photo of the end table.  We could not find anything to fit the room exactly.   We found this table at Lowe's and re-did it.
The top was wood, the bottom metal but not silver.  We spray painted the bottom bright silver and painted the top black followed up with two coats of polyurethane coat so nothing sticks to the paint.  We waited 7 days to use it.  So worth the work.
     

Monday, May 13, 2013

Just As Good As Olive Garden Bread Sticks Using Your Bread Machine

Oh my goodness, who does not adore Olive Garden's Bread Sticks?  We LOVE them.  It is not something that I would made allot due to them not being a healthy choice,  but every once in awhile I would love to be able to serve something like them. 

I have tried a few different recipes that vowed that they were copy cat's of the famous bread stick.  In fact I tried one yesterday that was NO where even near a light fluffy bread stick.  The batch went into the garbage.

Today I just had to try again.  Were were having an Italian dish so I was determaned to give it one more try.  I told everyone here one more shot.  If it did not work I would give this one up. 

This batch Worked--------
 They ended up darker than Olive Garden's but were fluffier then yesterdays and the taste was amazing.  Our 14 yr old said "Thank goodness you think  they turned out cuz I really like them".  Anyone out there that has a 14 year old you know that is the seal of approval.

Bread Sticks-Kind of like Olive Garden 
Adapted from the recipe by Todd Wilbur found here http://abcnews.go.com/GMA/recipe?id=11745412

Ingredents

For Bread
1 cup plus 1 tablespoon warm water 
1/4 cup melted butter
2 Tablespoons Sugar
1 1/2 Teaspoon Salt
1 Package Yeast
3 Cups Bread Flour

For Top
3 Tablespoons Unsalted Butter Melted
2 Teaspoons Garlic Powder 


1.  Run your tap water until hot to touch.  Measure out water, place into bread machine pan.  
2.  Melt  butter in Microwave for about 30 seconds.  You want it really soft but not a total water consistency.  Add to water in machine
3.  Add Sugar and Salt.  Assure that both are disolved in water/butter liquid.
4.  Add Flour then Yeast on top.
5.  Program bread machine to Dough cycle.
6.  Allow to finish cycle, remove from machine and punch down dough.
7.  Divide dough into 12 balls.  Each should be about 2 oz.
8.  Roll out into a snake type roll of about 7 inches.  They do shrink a little.  Place on prepared pan of foil, or parchment paper.  Spray with oil if you do not have a non stick surface.  I used non-stick foil so I needed no spray. 
9.  Allow to rise for and additional  1 1/2 hours.
10.  Pre-Heat oven to 400 degrees.
11.  In a seprate small bowl melt 4 tablespoons of butter.  Add 2 teaspoons garlic, mix together for topping.
12.  After bread sticks have been in oven for 8 minutes remove.  With a basting brush spread butter mixture over bread sticks.  Return to oven for 4 more minutes.
13.  Remove and brush the remaining butter over bread sticks.  Enjoy!          
 This is what it looked like after the dough cycle finished.  Mine is at 1.5 hours start to finish.  It was just right.
 Divide dough into 12 equal portions of about 2 oz each.
Roll out into a bread stick of about 7 inches long.  It will shrink fast at first so make a little longer than you think you should.
 
 Place on a greased cookie sheet, parchment paper or a foil lined pan.  Allow to rise for another 1.5 hours.
Total Yummy when you have the butter over the top and they are cooked.  They are even good when cooled.

Enjoy!
 

Saturday, May 11, 2013

Bread Machine Soft Pretzel Bites

I have to say this is one of the first recipes ever that I fell in LOVE with for my bread machine.   Years ago I purchased this lovely little book.  I was not sure it could be found anywhere any more but here it is.


Mine has seen better days.  I have had this book for years and years.  I continue to go back to it.

Usually I only do Soft Pretzels on Christmas but on Pinterest I saw where someone made pretzel bits.  I knew my recipe had to come out for a side roll for a dinner.  They were WONDERFUL!  I only had a few (well maybe 3) so I think it was allot less than if I would have had a whole pretzel.  I will still be making these on Christmas Eve.

Place all ingredents into bread machine in order of recipe.

Dough
1 1/8 Cup Hot Water
2 teaspoons Sugar
1/2 teaspoon Salt
3 Cups Better for Bread Flour   

Also needed
2 Quarts Water add 2 tablespoons baking soda
1 Egg beaten for top of bites  
Sea Salt

1.  As stated above, place all ingredients into bread machine as listed.   Place Bread Machine on Dough Cycle and allow to start and continue through cycle.
2.  Once done punch down dough.  Spray oil lightly on surface you will be placing dough.  Grab a handfull of dough and roll out into a log type roll.  Cut into bite size pieces.  Cover and allow to rise for at least 30 minutes.
3  Place water in a pot that is not aluminumAdd baking soda to water and allow to boil. 
4.  Once bites have risen for at least 30 minutes drop into boiling water cooking on each side for 30 seconds.  Take slotted spoon and remove to paper towels to drain.  Once drained remove to a foil lined cookie sheet.  Continue until all bites are cooked in water/baking soda combination.   
5,  Brush bites with your beaten egg and sprinkle with sea salt. 
6  Bake in a 450 degree oven for 10 to 12 minutes or until golden brown.
Serve warm

So I have made this recipe 3 dozen times or more over the years.  I have found out that they do not keep well at all.  No matter what I did they always were crazy good fresh.  Not so much the day after.

You just have to try them though.  Do know that you can do this recipe and shape into a pretzel.  That is what I do usually.   


                        Roll Out Into A Log Type Of Shape

               Cut Into Bite Size Pieces As Shown.  Not Too Small.

                                      Allow to Rise Again

          Place Into Water Mixture, They Will Puff Up In This Step

 Place Again On Cookie Sheet, Brush With Egg And Sprinkle Sea Salt Over Top
Oh My Goodness....So Good.... Best I Have Ever Eaten....

Adapted From The Bread machine Cookbook VI